Scanning Receipts
Last updated About 1 year ago
The scanner will attempt to extract the date, vendor, total amount (not subtotal), tax fields, saved payment methods, and category. You can tap on any field (image included) to edit it before saving.
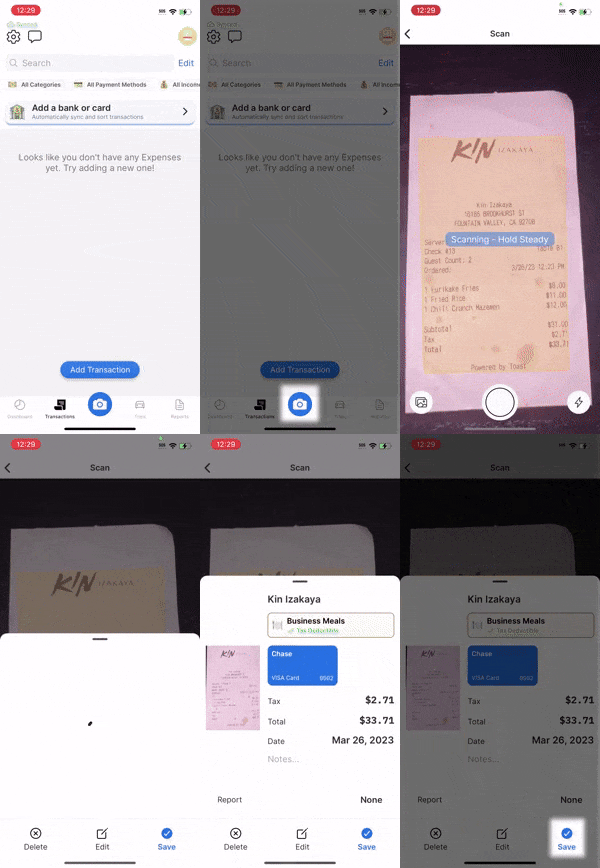
To automatically scan a receipt
For the best results, place the receipt on a contrasting background with good lighting. For example, place a light-colored receipt on top of a dark surface.
Tap the blue “Scan” button (bottom of the screen)
Hover the phone over the receipt - try to capture a flat angle (tilt the phone forward if needed)
A receipt preview will appear. You can tap any field to edit it.
Editable fields (tap here to expand)
Editable fields (tap here to expand)
vendor
category
payment method
total and tax
date
add to report
description field
transaction number (if enabled via workspace settings)
Tap "Save" when done, or tap "Edit" to attach more images to the receipt
After a receipt is saved, it can be viewed in the "Transactions" tab.
Scanning too quickly
If the scanner is capturing too quickly, consider disabling auto-capture by tapping “Auto Capture: On” at the top right.
Other ways to scan
Manually scan a receipt (free plan)
Manually scan a receipt (free plan)
Tap the "Transactions" tab
Tap the "Add Transaction"
Tap "Attach Receipt"
Using your phone's camera
Using your phone's camera
Tap the blue “Scan” button
Tap the gallery icon (bottom-left)
Tap "Take Photo"
From your device gallery
From your device gallery
Tap the blue “Scan” button
Tap the gallery icon (bottom-left)
Tap "Choose from Gallery"
Select an image to scan
Scan a PDF file
Scan a PDF file
Tap the "Transactions" tab
Tap "Add Transaction"
Tap "Attach Receipt"
Tap "PDF Upload"
Cropping images
When viewing or editing a transaction, tap "View Receipt" next to the desired image
Tap "Crop"
Android: Press on a corner and drag it to crop ➜ Tap the checkmark (top-right) to save
iOS: Tap the "↺" symbol ➜ Drag a corner to crop ➜ Tap "Choose" to save
Tap the "<" symbol (top-left) to exit and tap "Save" (bottom-right) to save any changes made
Was this helpful?
Still need help? Share an idea