Manage Categories
Learn about managing categories in your workspace. Users with the "member" role cannot do certain actions.
Last updated About 1 month ago
Categories are shared across your workspace. Members can pick a category but cannot add, edit or delete one, so the steps below need the manager or admin role.
Adding a Category
Mobile App
Mobile App
To add a category through the workspace settings
To add a category through the workspace settings
Tap the gear icon (top-left)
Tap “Workspace Settings”
Scroll down
Tap “Categories”
Tap “Add Category”
Enter a category name
Tap “Save”
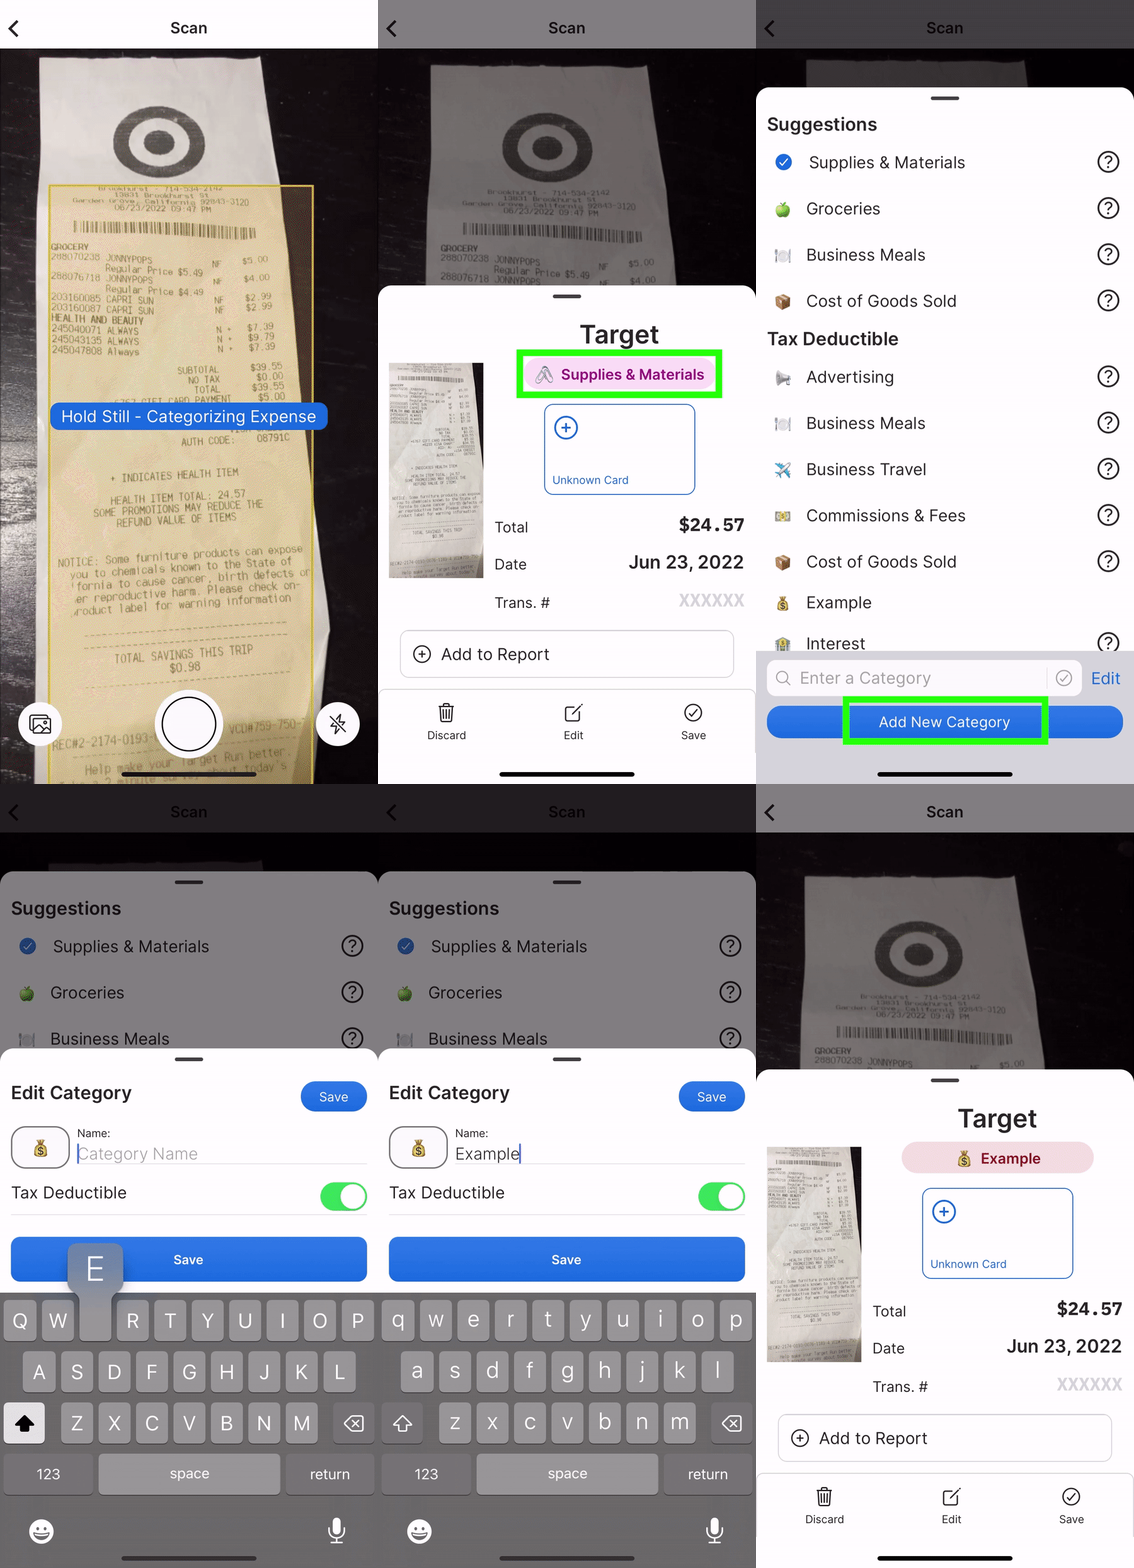
To add a category through the Quick Scan UI
To add a category through the Quick Scan UI
Tap the “Scan” button
Scan a receipt until the receipt preview appears
Tap the current category
Tap "Add Category"
Enter a category name
Tap "Save"
To add a category when editing an expense
To add a category when editing an expense
Tap the “Transactions” tab
Tap an expense
Tap the existing category
Tap “Add Category”
Enter a category name
Tap “Save”
Web App
Web App
Click the "Settings" tab
Click the "Categories" section
Click “Add Category” (at the top)
Enter a category name, and a GL code if you use one
Set "Tax Deductible" and "Tip Eligible"
Click "Save Category"
Editing a Category
Mobile App
Mobile App
To edit a category through the Quick Scan UI
To edit a category through the Quick Scan UI
Tap the “Scan” button
Scan a receipt until the receipt preview appears
Tap the current category
Tap “Edit” (top right)
Tap the desired category to edit it
Tap “Save” when done
To edit a category when editing an expense
To edit a category when editing an expense
Tap the "Transactions" tab
Tap an expense
Tap the current category
Tap “Edit” (top right)
Tap the desired category to edit it
Tap “Save” when done
Web App
Web App
Click the "Settings" tab
Click the "Categories" section
Tick the "Tax Deductible" or "Tip Eligible" checkbox to change it straight from the table
For anything else, click the category row to open its edit window
Change the icon and name
Click "Save Category"
Deleting a Category
When a category is deleted, it is deleted from all expenses that have that category. There is no confirmation when deleting a category.
Mobile App
Mobile App
To delete a category via workspace settings
To delete a category via workspace settings
Tap the gear icon (top-left)
Tap “Workspace Settings”
Scroll down
Tap “Categories”
Tap the undesired category
Tap “Delete”
To delete a category when editing a transaction
To delete a category when editing a transaction
Tap the "Transactions" tab
Tap an expense
Tap the current category
Tap "Edit" (top right)
Tap the undesired category
Tap “Delete”
Tap “Done”
Web App
Web App
Click the "Settings" tab
Click the "Categories" section
Click the trashcan icon next to the category you want to delete
Set Tax Deductible and Non-Deductible Categories
Mobile App
Mobile App
Tap the gear icon (top-left)
Tap “Workspace Settings”
Scroll down
Tap “Categories”
Tap the desired category
Toggle on for tax-deductible, toggle off for non-deductible
Tap “Save”
The same screen has a "Tip Eligible" toggle. Turn it on for categories where you want a tip field on the expense.
Web App
Web App
Click on the "Settings" tab
Click the "Categories" section
Click the checkbox (tax-deductible column) to set it to tax-deductible (check-marked)
The Default Category List (preset)
Business workspaces will start with both category lists. Personal workspaces will start with only the non-deductible categories.
Tax Deductible Categories
Tax Deductible Categories
Advertising
Business Meals
Business Travel
Commissions & Fees
Contractors
Cost of Goods Sold
Insurance
Interest
Legal & Professional Services
Licenses & Membership Fees
Parking & Tolls
Payroll
Phone & Service
Professional Development
Property Taxes
Rent of Business Space
Repairs & Maintenance
Shipping, Freight & Delivery
Software Subscriptions
Supplies & Materials
Tools & Equipment
Utilities
Non-Deductible Categories
Non-Deductible Categories
Eating Out
Entertainment
Fees
Gas
Gifts
Groceries
Household Maintenance
Medical & Health
Pet Care
Rent
Shopping
Subscriptions & Memberships
Uncategorized
Vacation and Travel
Vehicle Maintenance
FAQs
How many categories can I add or delete?
How many categories can I add or delete?
You can add or delete as many categories as you want. There is no limit.
What happens if I accidentally delete a category?
What happens if I accidentally delete a category?
You can contact customer support to restore your category for you. Or input “Unknown Category” into the search bar in the “Transactions” tab; then use bulk-editing to set a new category for them.
Can I merge categories?
Can I merge categories?
It’s not possible to merge categories together. Please filter expenses by the unwanted category and use bulk-editing to set the desired category for those expenses. It is then safe to delete the category when no expenses are using the unwanted category.
Was this helpful?
Still need help? Share an idea